

How to achieve consistent lengths with your nail enhancements
By Katie Barnes | 27 July 2018 | Expert Advice, Feature, Technique

Educator and award-winning nail technician, Katie Barnes, serves u advice on achieving consistent nail lengths…
 Did you know that each nail is naturally a different length and grows at different rates, meaning it is unlikely that they will be exactly the same length at any time?
Have you ever experienced a client return after their infill, noticing these different lengths and assuming that you had mis-measured in the previous service? This is more likely to be due to the fact that the nails grow at different rates.
The rate of growth of a normal nail is between 0.5 – 1.2mm per week. In relation to this, the rate of growth is three times faster for a nail biter than that of a healthy fingernail. The fastest to slowing growing nails are: middle finger; ring finger; index finger, thumbnail, little finger. The rate of growth of the toenail is three times slower than that of the fingernail. The rate of growth in a nail differs by 0.1mm which can be quite significant, especially on a short nail. With this in mind, it is important to take this into consideration when creating enhancements to ensure consistency.
When extending a nail, a tech will often automatically be tempted to be guided by the grid system on the form, asking the client which number they would like the length of the enhancement to reach. This question is usually asked when the tech is starting on the little finger, which naturally has a much shorter nail bed than the others so if you follow this length on all 10 nails, you will end up with very inconsistent lengths. Also take this into consideration if you tailor your forms and cut them to fit. Some may require more tailoring, cutting into the form and making it shorter.
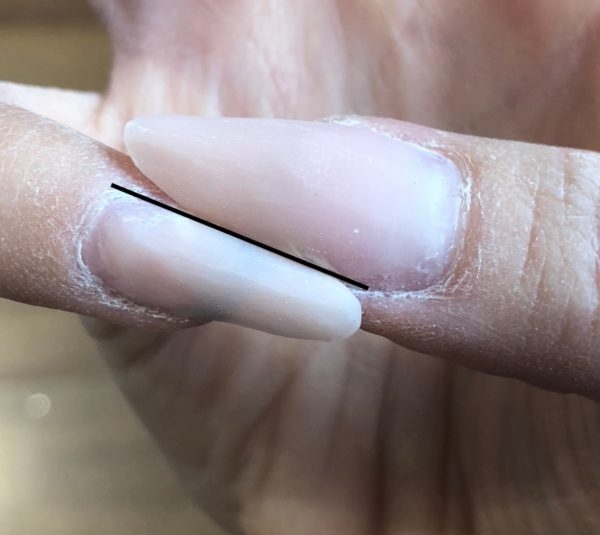
As a guide, the three middle fingers (index, middle and ring) should be the same length and the pinkie and thumb should be the same length as each other when placed side by side from the cuticle on the pinkie to the corner of where the natural nail free edge ends on the thumb (see photo below) to achieve a harmonious look that flows. To check the consistency of lengths of the middle three nails, hold the three nails together at the same position. You can hold a file under this to check the free edge consistency. Both hands should also be measured together. The nails must also match hand to hand from cuticle to free edge.
When measuring a one colour enhancement, the length should be measured from cuticle to free edge and when measuring an enhancement with a smile line, the lengths should also be measured from cuticle to the highest point of the smile line and from the corner of the smile line to the free edge.
When creating competition nails, each competition will have slightly different measurement requirements, so make sure you read the rules of each competition carefully.
You can use a ruler or compass to measure lengths, taking the above rule of the pinkie and thumb into consideration. If you don’t have a ruler, you can make measurements on a file and use this to work from. Rather than trying to remember or keep re-measuring, create a small white dot on your nail form or tip as a guide.
When filing the enhancement, it is important to remember not to over file the length or use different angles to file each free edge shape, otherwise you will lose the matching lengths and end up with a different shaped free edge on each nail. Always use your brush to create the shape, rather than relying on your file.
Love Katie B x