

How to file 5 different nail shapes for your clients
By Katie Barnes | 07 January 2021 | Expert Advice, Feature, Technique

Educator, former Scratch columnist and award-winning nail stylist, Katie Barnes, reveals how to file various nail shapes for your client…
When filing nail shapes on enhancements, it is important to remember that the way your form is fitted and how you build the product is paramount for the correct shape and longevity of the structure. You cannot alternate between shapes with just a filing technique otherwise your apex placement as well as your lower and upper arches will be incorrect leading to premature service breakdown.
The way you hold your file is important when filing all parts of the enhancement, including your sidewalls/lower arch, parallel sides, apex and free edge.
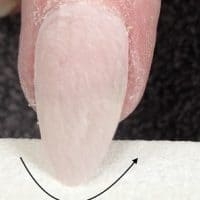
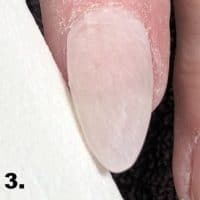
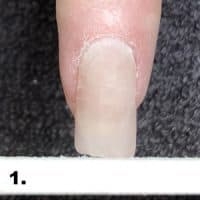
Oval, round, almond
To achieve any of these shapes:
1) Hold the file at a 45-degree angle from the extension to the free edge and slowly roll up.
2) From there, file around the free edge to create either a pointed or rounded end to suit your client.
3) To file the parallel sides, hold your file flat and move back and forth from free edge to cuticle. Repeat this step on the other side, whilst ensuring you keep checking your free edge thickness.
4) Move to the centre and file in the same way from free edge to apex (back 1/3).
Refine with a 180-grit file in a polishing movement from one side all the way to the other to ensure an even curve. Your upper arch should come down completely straight from the apex to the free edge at a 45 degree angle. Your upper arch and lower arch should create a triangle shape.
 |
 |
 |
 |
Stiletto
The filing technique is similar to above, but your lower arch must be absolutely straight. Follow steps 1, 3 and 4 from above. Don’t be tempted to try to round the tip or sidewalls, these should come out absolutely straight and to a perfectly sharp point.
Turn the finger on its side so you don’t over file this and in turn your lower arch tapers upwards. Refine with a 180-grit file in a polishing movement from one side all the way to the other to ensure an even curve.
Your upper arch should come down completely straight from the apex to the free edge at a 45-degree angle. Your upper arch and lower arch should create a triangle shape.
Square
To file this shape, begin with the free edge then the side walls.
1) Hold your file completely straight against the free edge to create the true square shape.
2) To file the side walls, turn the client’s finger on its side and then, hold the file at a 45-degree angle from the extension to the free edge and slowly roll up, making sure the lower arch is absolutely straight and parallel with the side of the finger and not dipping down.
3) To file the parallel sides, hold your file flat and move back and forth from free edge to cuticle. Repeat this step on the other side, whilst ensuring you keep checking your free edge thickness. This is the same techniques as the above shapes.
4) Move to the centre and file in the same way from free edge to apex (1/2 extended pink).
 |
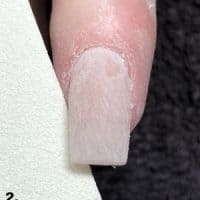 |
Refine with a 180-grit file in a polishing movement from one side all the way to the other to ensure an even curve. Your upper arch should come down completely straight out from the apex to the free edge and not curve at all. Your upper arch and lower arch should create a rectangular shape.
Squoval
A squoval nail is built in the same way as a traditional square but when filing the free edge, tilt the file underneath the corners.

Tapered Square/Ballerina
File the same as a square but angle your file more on the tapered edges. To file the parallel sides, follow the steps from the other shapes. The apex is in the back 1/3. Your upper arch should come down completely straight out from the apex to the free edge and not curve at all. Your upper arch and lower arch should create an upside down triangle.
Love Katie B x