
Christmas pudding nails

Step by Step
Salon System nail expert, Caroline Roberts, owner of Nail Fairy, showcases how to create this adorable Christmas pudding nail look, using Gellux Mini nail shades…
Step 1

Prep the nails and push back the cuticles. Shape and buff the natural nail bed with a grey and yellow buffer. Dust and wipe the nails with Gellux Prep + Wipe, then apply two thin layers of Gellux Builder Gel in Rose Pink, curing each layer for 60 seconds. Lightly buff the nails for a matte look, using a nail brush to remove any dust.
Step 2

Mix Gellux Mini Bare Faced and Gellux Black Onyx to create a dark chocolate brown shade. Using a thin liner art brush, apply to the little finger, creating a French tip and repeating this on the middle finger and thumb. Next, using a dotting tool, create a circle of the colour in the middle of the index fingernail and do the same on the tip of the ring fingernail. Cure for 60 seconds.
Step 3

Using the thin liner art brush, apply Gellux Purely White to the top of the brown circle on the index finger and drag down for a dripping effect. Repeat this step on the ring finger. Cure for 60 seconds.
Step 4
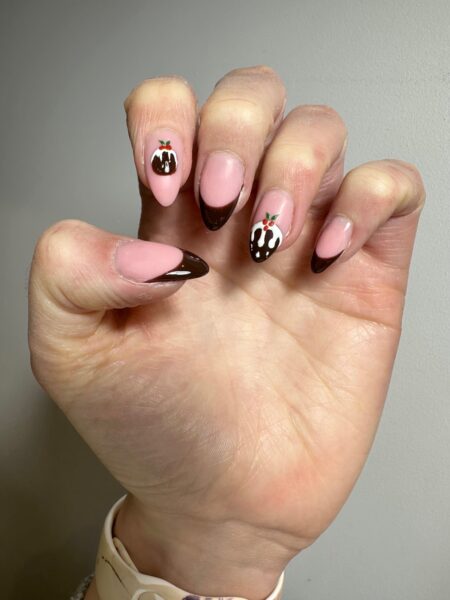
Using Gellux Mini Really Red and a dotting tool, place two red dots on top of the white on the index finger and three dots on top of the white on the ring finger, creating berries. With a thin liner art brush, apply GELLUX Mini Lucky Shamrock to create two leaves next to the berries. Cure for 60 seconds.
Step 5

Using a dotting tool, apply Gellux Purely White to the index fingers, creating tiny dots around the Christmas pudding. Apply a small amount of the shade to the berries and leaves to create a snow effect on them. Cure for 60 seconds.
Step 6

For a glossy finish, apply Gellux Shiny Top Coat and cure for 60 seconds. Wipe sticky residue with Gellux Prep + Wipe, before applying cuticle oil to finish.
