
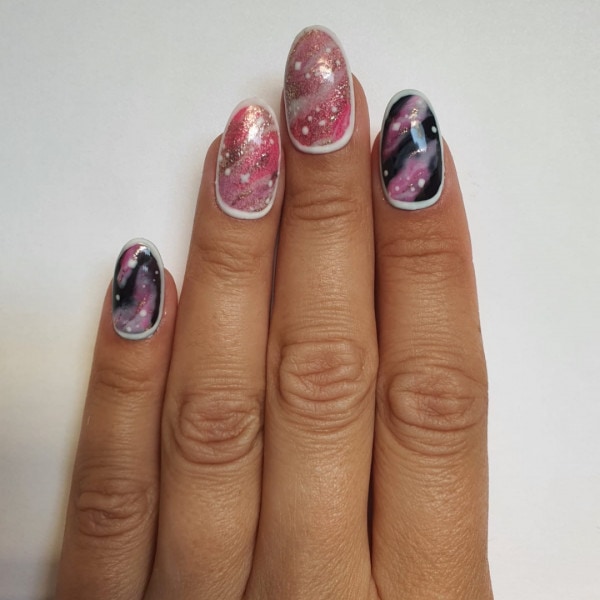
Cosmic dust nails

Step by Step
Salon System nail expert, Karen Louise, has created a Cosmic dust-inspired step by step using GELLUX.
Step 1

Prepare the nails, file to shape, push back cuticle and gently buff the nail plate. Brush away any dust and wipe over with the GELLUX Prep + Wipe. Apply the GELLUX Fast Bond to nails and let dry. Then, apply a thin coat of GELLUX Easy Off Base Coat to the nails, and cure.Apply GELLUX Black Onyx to the thumb, index, and pinky fingers, and GELLUX Heart of Gold to the middle and ring finger and cure. Repeat the application of GELLUX Black Onyx and cure.
Step 2

On a nail art palette, mix GELLUX Purely White and GELLUX Easy Off Base Coat. Using a detailing brush or make up sponge, dab the mix down the nails, over the GELLUX Black Onyx - this can be a ruffled look, it does not have to be neat. Once happy cure for 30 seconds.
Step 3

Now create a mix of GELLUX Main Stage with GELLUX Easy Off Base Coat, and a separate mix of GELLUX Pink Pinch with GELLUX Easy Off Base Coat. Dab these over all over the nails, blending them when they meet. When dabbing over the Purely White, do not worry if you go over the sides, as this helps to create the cosmic effect. Cure for 30 seconds once you are happy with the blends.
Step 4

With a small detailing brush or small dotting tool, apply GELLUX Purely White in small dots around the nails, as if they are stars and cosmic dust. Create tiny stars shapes too with GELLUX Purely White,
then cure all nails for 30 seconds.
Step 5
Outline each nail with GELLUX Purely White. Flash cure in between and then once all nails are done, you can fully cure. Finally, apply the GELLUX Shiny Top Coat over the design, but make sure you still have the matte effect base as this adds more depth and shine to your design. Cure for 60 seconds. Wipe the nails with GELLUX Prep + Wipe and apply GELLUX Nail & Cuticle Oil.
