

How to ensure a correct gel polish cure – and why it’s so important
By Katie Barnes | 10 December 2019 | Expert Advice, Feature

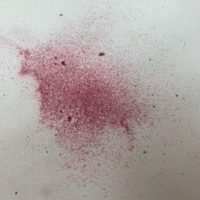 Do your nail files or dust filings look like this when you are performing a gel polish removal? If so, your gel polish was not properly cured. Let’s discuss some possible reasons why this may happen.
There’s a big difference between ‘cured’ and ‘properly cured’ and it can be difficult for nail techs to recognise this because while the top layers of gel may appear hardened, the lower layers may not be.
Are thin layers really that important?
Gels need to be applied in thin layers to ensure a proper cure. UVA light is strongly absorbed by gels. The top layers absorb the majority of the UVA before it can penetrate deeper into the gel layers. This misconception of the product appearing cured can lead to under curing issues. More thin layers are better than fewer thick layers to guarantee the correct thickness of gel is applied. A pale or less pigmented gel polish colour may prove tempting to apply a thicker layer to compensate for this. However, the application of a base colour with a strong pigment underneath would be a better solution.
Why you must use the correct lamp
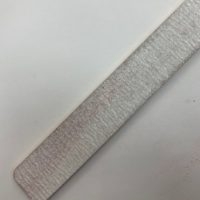
Under cured product on the nail file
There is a lot of information out there regarding the use of matching gel polish lamps. While one brand’s lamp may appear or may actually cure another brand’s gel, we as nail techs cannot guarantee a proper cure I performed a test using a branded gel polish in one lamp, which was not the designed lamp for the gel polish. It appeared cured; no issues appeared to occur. I also performed the same test using the matched lamp. It was only then, when compared and when the gel polish was removed 2 weeks later that an issue was highlighted. The first set was much spongier than the second set. When the first set was filed, it left small chunks of gel polish on the file. The second set, did not. This demonstrates that the first set was in fact not properly cured, even though it appeared so from the out layers being hardened.
While it may appear that under curing is not a problem, this example highlights that allergy risks still exist for the tech and the client.
Time to change your bulbs or lamp
UV lamp bulbs should be changed approximately every two to four months for a full clientele and approximately every six months for less busy techs. It can be good practice to make a note of when your bulbs were last changed in a diary or place a sticker on the back of the lamp. If you begin to notice any signs of curing issues, unusual staining or other concerns, it may be time to change your bulbs.
We know that clients can often knock their nails on the lamp and bulbs, leaving cured product on these areas so it is also important to regularly and carefully clean nail dust and cured nail product from the bulbs regularly. Dirty bulbs have a lower UV intensity and so become less effective. Using a cleanser solution rather than acetone will avoid damage to the lamp.
There is a myth that LED lamp bulbs have an unlimited life span. Jim McConnell of Light Elegance comments: “Most LED lamps last approximately two years of full clientele. I would consider 35-40 clients per week a full clientele. The lamps start to decline in irradiance and at roughly two years, of use the irradiance loss can be significant enough to justify replacement of the curing lamp. Some curing lamps last longer and some shorter than two years. Another aspect to consider is technology. Tech is always changing and improving. After a few years, new technology becomes available and the industry responds with a newer curing lamp.”
How do you recognise under curing?
While problems may not arise during service or for the duration of the client’s wear, the issue then occurs when the product is removed. When this is either filed or soaked off, it exposes both tech and client to under cured product either in dust filings or as it disperses from the nail.
A key indication of under curing will be ‘bubbling’ or peeling of the gel which can be recognised as small holes or air pockets underneath the gel that indicate where adhesion has been lost. This can often occur more commonly on the thumbs, due to client difficulty in correct hand placement. This may not become evident until after the client leaves their appointment. Other signs of under curing may be: loss of clarity; cloudy finish; thicker than normal sticky dispersion layer; dulling, soft surfaces; areas where the colour was too easily wiped or filed away.
If a client’s skin itches whilst soaking off the product, this can be a sign that the nail coating was not properly cured. As these unreacted ingredients escape from the nail coating into the acetone, it can cause skin allergies or irritation with prolonged or repeated contact.
Love Katie B x